Heart’s Desire

HeartsDesireMuffin

Rich & moist, chocolate banana muffins with dried cherries and bittersweet chocolate.

Heart’s Desire Muffins

Makes 5

3/4 c. all-purpose flour

1/2 c. granulated white sugar

1/4 c. natural cocoa

1 1/4 t. baking powder

1 t. ground cinnamon

1/4 t. baking soda

3/4 c. mashed overripe banana

1/4 c. unsalted butter, melted

1/4 c. buttermilk

1/2 c. dried cherries

1 1/2 oz. fine bittersweet chocolate, broken into small pieces

2 T. confectioner’s sugar, stirred together with a pinch of cinnamon.

Cinnamon gumdrops, optional, or desired garnish

Paper heart-shaped muffin molds*

  1. Preheat oven to 400 degrees F.
  2. In a large bowl, whisk together flour, granulated sugar, cocoa, baking powder, cinnamon and baking soda. Set aside.
  3. In a medium bowl, beat together banana, butter, and buttermilk.
  4. Stir wet ingredients into dry ingredients until no dry spots show. Fold in cherries and broken chocolate.
  5. Spoon batter into muffin molds. Smooth tops with the back of a spoon.
  6. Bake for about 22 minutes or until muffins are firm to the touch.
  7. Sift confectioner’s sugar blend over muffins. Garnish, if desired. Serve (either in paper molds or removed from them.)
  • Available through Wilton and speciality baking supply companies.

Enjoy!

May your heart be full  of happiness this Valentine’s Day!

HeartsDesireMuffin@

Black Forest Cupcakes

CupcakeBlackForest

These light-textured chocolate cupcakes, served with whipped cream and cherries, are really fun for guests. An added bonus is that you can make the cupcakes ahead of time and freeze them until you have company. Just thaw, top with whipped cream, garnish and serve! Ready to start thinking about Valentine’s Day?

Black Forest Cake Cupcakes

Makes about 24

Ingredients:

2 c. all-purpose flour

2/3 c. Dutch-process cocoa powder*

1 1/2 t. baking soda

1 t. salt

1 c. whole milk (or sour cream for a denser cupcake)

3 lg. eggs

2 t. cherry liqueur

1 c. unsalted butter, softened

1 c. granulated white sugar

1/2 c. light brown sugar, packed

1/2 c. dried cherries, finely chopped

2 oz. semisweet chocolate, finely chopped, plus extra for garnish

Sweetened whipped cream for topping

24 fresh dark sweet cherries

Directions:

  1. Preheat oven to 350 degrees F. Line 2 12-muffin pans with muffin papers.**
  2. Sift together flour, cocoa, baking soda and salt into medium size bowl. Set aside.
  3. In a small bowl, lightly beat together milk, eggs and cherry liqueur. Set aside.
  4. In a large bowl, beat together butter and sugars on high speed until light and fluffy. Scrape down sides of bowl.
  5. On low speed, beat in 1/3 of the flour mixture. Scrape sides. On medium speed, beat in 1/2 of wet ingredients. Scrape sides. Repeat, beating in 1/3 of  flour mixture, remaining 1/2 of wet ingredients, and then remaining 1/3 of flour mixture, scraping down sides of the bowl in between.
  6. Mix together chopped cherries and chocolate and then fold them into the cupcake batter.
  7. Divide batter equally between muffin cups. Cups should be about 3/4 full.
  8. Bake for 20 –  25 minutes or until no wet spots appear on muffin tops and muffins are firm to the touch. Do not overbake.
  9. Place muffin pans on baking racks for 15 minutes, then remove muffins, and place them on racks to finish cooling.
  10. To serve, top with whipped cream, grated chocolate and a fresh cherry.

Enjoy!

* If you need to, you can substitute natural cocoa, but Dutch-process has better flavor in this recipe.

** I use plain white papers for baking, then slip the muffins into decorative papers or foils for serving.

Gluten-free Cornish Hevva Cake

HevvaCake4

I recently came across a recipe for Cornish Hevva cake on FrugalFeeding.com and thought that it looked delicious and also that it sounded like it had an interesting history behind it. I loved the image of the fisherman’s housewives starting to bake as soon as the lookout called that their husbands were returning home. So I made a mental note to give “the cake” a try sometime.

I made a gluten-free version which produces a sweet, crumbly biscuit. It reminded me of a very thin version of Scottish shortbread with dried fruit. It went very nicely with a glass of milk  – for my first piece, which I ate before it had any time to cool – and also with a cup of tea later on.

HevvaCake2

Ingredients

1 1/3 c. (scant) gluten-free all-purpose flour

1/4 c. granulated white sugar + extra for sprinkling

1/2 t. ground cinnamon

1/2 t. ground ginger

pinch salt

7 T. + 1 t. unsalted butter, cut into pieces

8.5 oz dried blueberries

3 T. whole milk, approximately

Directions

1. Preheat oven to 375 degrees F. Butter a large baking sheet.

2. Whisk together flour, 1/4 c. of the sugar, cinnamon, ginger and salt.

3. Using your hands, work butter into dry ingredients.

4. Mix in blueberries using a large spoon. Then slowly stir in milk until mixture forms a crumbly, stiff dough. (It holds together like a dough when pinched.)

5. Scrape sides of bowl and transfer the dough to the center of the greased baking sheet. Lightly pat into a disk, then roll out to just under 1/2-inch thick.

6. Using a paring knife, score the top of the dough to resemble a fishing net. Sprinkle with a little more sugar.

7. Bake cake for 25 t0 30 minutes or until there are no raw spots. (Because this is gluten-free, it doesn’t really get golden brown.)

HevvaCakeUnbaked

Notes

I made a few minor changes to Nick’s recipe on Frugal Feeding

• I substituted dried blueberries for currants, because I was out of currants.

• I substituted gluten-free flour (Glutino brand gluten-free all-purpose flour) for the plain flour, because I wanted a gluten-free version.

• Nick’s directions call for rolling the dough out on a floured surface, then transferring the dough to a greased baking sheet. I just rolled it out directly on the greased baking sheet. I wasn’t sure that I wanted to mix in any more flour since I had used a substitution and wasn’t sure how that would affect the recipe.

• I sprinkled the sugar on before baking because I thought that would work fine.

• I forgot to cut the pieces on the diagonal for serving. Old habits. I’ve made a mental note to correct that next time – but the biscuits were still delicious!

• I think that American cooks can probably go ahead and use the whole 8 T. of butter that come in a stick. I weighed ingredients to convert from metric measurements and the butter measure came to 7 T. plus 1 t. For my first time making the recipe I wanted to stick to the original measures. If using 8 whole tablespoons of butter, one could probably also use a full 1 1/3 cup of flour. I’ll try that next time.

Thanks for introducing me to Hevva Cake, Nick!

Spiced Mexican Wedding Cookies

When baking an assortment of cookies for the holidays, it is nice to have both a variety of shapes and of flavors. Mexican Wedding Cookies are small, buttery, nut cookies, rolled in sugar that provide a contrast to drop cookies and to cut-out cookies in shape and provide contrast to chocolatey and to fruity cookies in flavor. This version, with spices mixed into the rolling sugar is both flavorful and aromatic. I made this batch last night and loved the way that they made the kitchen smell. Added bonuses are that these cookies are easy to make keep well for gift-giving. Enjoy!
MexicanWeddingCookiesXMas4

Spiced Mexican Wedding Cookies

Makes about 32

Mexican Wedding Cookies – also known as Russian Tea Cakes, Italian Tea Cakes, Snowball Cookies, and Butter Balls, and probably a dozen other names – are a traditional Christmas cookie  in the United States. They are buttery cookies made with ground nuts, baked, and then rolled in confectioner’s sugar. In this version, aromatic cinnamon and cloves are added to the sugar.

• 1/2 c. unsalted butter, softened

• 2 T. confectioner’s sugar + 1/2 c. extra for rolling cookies

• 1 t. vanilla extract, or almond extract (if using almonds), or hazelnut extract (if using hazelnuts)*

• 1 c. all-purpose flour

• 1 c. pecans, walnuts, almonds or hazelnuts, very finely chopped or pulsed in the food processor to the texture of coarse kosher salt

• 1 t. ground Vietnamese cinnamon

• 1/4 t. ground cloves

  1. Preheat oven to 375 degrees F. Line 2 baking sheets with parchment paper.
  2. In large bowl, beat butter until light and fluffy. Beat in 2 T. of the confectioner’s sugar and the vanilla extract. On lowest speed, beat in flour and then nuts. The mixture will be very crumbly.
  3. Spoon a small about (about 1 heaping teaspoon) of mixture into one of your palms. Squeeze lightly until the mixture holds together then shape into a ball. Place on baking sheet. Repeat with remaining mixture, spacing the balls well apart on the 2 baking sheets.
  4. Bake for about 11 to 13 minutes or until cookies are lightly browned on the bottom. The tops of the cookies will be very pale. Place baking sheets on wire racks and allow cookies to cool.
  5. Once cool, whisk the spices into the remaining 1/2 c. of confectioner’s sugar. Roll the cookies in confectioner’s sugar mixture until well coated. Once you have rolled all of the cookies once, roll them in the mixture again until you have used all of it. To avoid getting finger prints in the cookies, transfer cookies to a serving plate or a storage container using a fork to lift them.

Enjoy! Happy Holidays!

Young Bakers & Chocolate Mint Crinkle Cookies Recipe

It was cold and dreary here today, so my friend Sara and her daughters came over to bake cookies. What a perfect afternoon to have the oven on … and the girls did a great job!

SH1

StH1

SH3

StH2

ChocolateMintCrinkles

Chocolate Mint Crinkles

Makes about 58 cookies

Chocolaty sugar cookies with Andes’ Mints.

1 c. all-purpose flour

1/3 c. Dutch process cocoa

1/2 t. baking powder

1/2 t. baking soda

1/2 c. unsalted butter, softened

1/3 c. light brown sugar, firmly packed

1/3 c. granulated white sugar

1 lg. egg

2 t. bourbon or 1/2 t. vanilla extract

1 1/4 c. finely chopped Andes’ mints or Andes’ creme de menthe baking chips

2/3 c. sparkling decorator’s sugars*

  1. Preheat oven to 325 degrees F. Line 4 baking sheets with parchment paper.
  2. Whisk together flour, cocoa, baking powder and baking soda. Set aside.
  3. In large bowl, beat together butter and sugars until light and fluffy. Beat in egg and then bourbon or vanilla extract. On lowest mixer speed, beat in dry ingredients and then mints.
  4. Scoop a rounded teaspoonful of dough, roll into a ball, roll in decorator’s sugar to completely coat and then place on baking sheet. Repeat, spacing balls of dough at least 2” apart. When the first baking sheet is filled, bake cookies for about 14 to 16 minutes or until just barely set. Meanwhile, finish rolling the remaining dough.
  5. As baking sheets come out of the oven, place them on wire racks and allow cookies to cool.

* Sparkling sugars are available through baking specialty companies such as King Arthur Flour and Wilton. For this recipe, I use white, green or gold sugar, depending on the occasion.

Happy Baking! Have a great weekend!

SH4

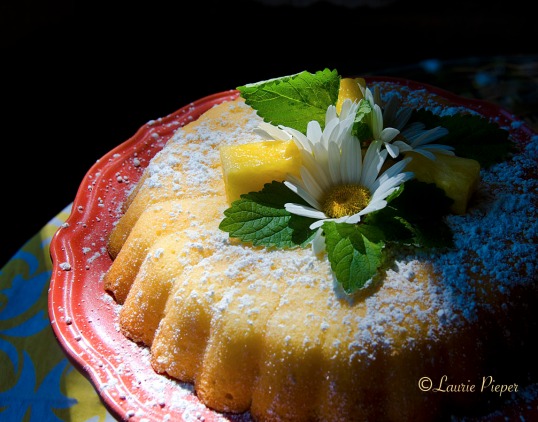
Fresh Pineapple Cake

PinappleCakeUncut

Fresh Pineapple Cake

This is a very light, moist cake with a coarse crumb that is not overly sweet. Serve for breakfast with fresh fruit and yogurt or for afternoon tea.

1 1/2 c. all-purpose flour or white rice flour (for gluten-free)

1 t. baking powder

1/4 t. salt

1 stick unsalted butter, softened

3/4 c. granulated white sugar

2 lg. eggs

1 c. buttermilk or whole milk

3/4 c. fresh pineapple cubes (between the size of raspberries and blueberries)*

confectioner’s sugar for garnish

edible flowers**, herbs, fresh pineapple for garnish, optional

1. Preheat the oven to 325 degrees F. Prepare an 8″ round cake pan or decorative cake pan with baking spray or with butter and flour. (For gluten-free, use rice flour.)

2. In a small bowl, whisk together flour, baking powder and salt. Set aside.

3. In a medium bowl, beat butter until it is light and fluffy. Add granulated sugar and continue to beat for about 5 minutes or until the mixture is light and fluffy. Scrape sides of bowl. Add eggs, one at a time, beating well after each addition. Scrape sides of bowl.

4. Lightly beat in 1/3 of flour mixture, then 1/2 c. of buttermilk or milk. Scrape sides of bowl. Repeat, and then beat in the remaining flour mixture.

5. Fold pineapple into batter. Spoon batter into the prepared cake pan, using the back of the spoon to smooth and level top of batter.

6. Bake for about 40 minutes or until a cake tester inserted into the center tests clean.

7. Cool cake in pan on a wire rack for 10 minutes. Invert cake onto cake plate to serve right away or onto wire rack to continue cooling. Dust the cake with confectioner’s sugar before serving. Garnish as desired.

* Canned pineapple tidbits can be substituted in the recipe for fresh pineapple, if well-drained first.

** Daisies and lemon balm leaves are shown here. Daisies are edible and taste similar to parsley. So they are not very dessert-like in flavor, but they are a pretty garnish.

Enjoy!

PineappleCakeSlice2

Banana Chocolate Crumb Cheesecake

Happy National Cheesecake Day on July 30th! I decided to mark the occasion by making one of my favorite cheesecakes – Banana Chocolate Crumb Cheesecake!

CheesecakeBananaChocolateCrumb

 Banana Cheesecake

This is a soft, not-too-sweet, delicately flavored banana cheesecake with a dark chocolate cookie crumb “crust”. The custard recipe comes from Rose Levy Beranbaum’s banana variation of her Cordon Rose Cheesecake in The Cake Bible – a truly excellent cookbook.

Make 1 day ahead

Ingredients (at room temperature)

1 lb. (2 8-oz. pkgs.) cream cheese

1 c. granulated white sugar

1 1/2 t. vanilla extract

1/4 t. salt

2 c. sour cream

2 large, very ripe bananas, enough to make 1 c. mashed

3 T. fresh lemon juice, strained

1 1/4 – 1 1/2 c crushed dark chocolate wafer cookies  (use gluten-free cookies for a gluten-free cheesecake)

Prepare Pan

1. Butter the inside of an 8″ springform pan.  Cut a circle of parchment paper to fit the inside of the pan – just smaller than 8″ in diameter. Butter the paper and then place it in pan.

2. Wrap the outside of the pan with a double layer of heavy-duty aluminum foil to prevent seepage from the water bath.

3. Have ready a larger baking pan – I use a 9″-square brownie pan – to use as a water bath for baking the cheesecake.

Directions for Making Cheesecake Custard

1. Preheat oven to 350 degrees F.

2. Using a mixer or large food processor, beat together cream cheese and sugar until perfectly smooth. Scrape bowl. Beat in vanilla and salt, then sour cream. Scrape bowl.  Mash bananas together with lemon juice. Beat bananas into custard. Scrape bowl.

3. Pour custard into prepared springform pan. Place pan in larger baking pan. Pour in 1″ of very hot water. Bake cheesecake for 45 minutes. Turn oven off, without opening the door, and leave cheesecake in oven for one hour.  Remove cheesecake from oven and from water bath.  Remove foil from pan.  Plan pan on a cooling rack and let cheesecake continue cooling at room temperature for one more hour. Cover  pan with plastic wrap. Chill cheesecake in refrigerator overnight.

Serving

1. The next day, wipe outside of cheesecake pan with a hot, damp towel. Run a thin spatula around the inside of the pan. Release the clasp on the springform pan and remove the outside of pan.  If there is condensation on the cheesecake, lightly pat it dry with a paper towel. Invert cheesecake onto a flat plate or a small cutting board covered with plastic wrap.  Remove parchment paper.

2. Pat cookie crumbs onto bottom and sides of cheesecake. Re-invert onto serving plate. Cover with plastic wrap and chill until serving. Garnish and serve.

Suggested Garnishes

• Whipped cream, chocolate shavings and banana and/or strawberry slices.

• Whipped cream and hot fudge.

• Whipped cream and dark cherries.

• For Banana Split Cheesecake, serve with whipped cream, banana slices, strawberry slices, pineapple chunks, chopped walnuts, chocolate sauce, and melted strawberry jam.

Enjoy! Happy National Cheesecake Day!

CheesecakeBananaChocolateCrumbSlice

Honey-Glazed Raisin Pecan Muffins (Gluten-Free)

Image

Honey-Glazed Raisin Pecan Muffins

2 c. white rice flour (gluten-free)

1/2 c. dark brown sugar

1 T. baking powder

2 1/2 t. ground cinnamon

1 c. Greek yogurt (full-fat)

1/2 c. melted butter

1/2 c. honey, plus extra for glazing muffins

2 lg. eggs

1 c. mixed jumbo raisins

1 c. chopped pecans

muffin papers or foils

Directions:

1. Preheat oven to  400 degrees F. Line a 12-cup muffin pan with papers or foils.

2. In a large bowl, whisk together flour, sugar, baking powder and cinnamon. Set aside.

3. In a medium bowl, whisk together yogurt, butter, 1/2 c. honey, and eggs. Add wet ingredients to dry ingredients and then stir with a mixing spoon until no dry spots appear. Fold in raisins and walnuts.

4. Divide batter between muffin cups, mounding batter up in the center of each muffin and rounding with the back of a spoon. (Batter will stand above the top of the muffin pan.)

5. Bake for 20 – 23 minutes or until firm to the touch. Remove muffins from the oven and immediately glaze each with about 1/2 t. of honey, spreading honey with the back of a spoon. Let cool for at least 10 minutes before serving. Muffins are best served warm with a bit of butter or jam. Enjoy!

Image

Have a lovely weekend!

Banana Mocha Coconut Muffins

The other morning, I had a guest on an almost vegan diet; so I made these delicious muffins which one would never know were free of dairy products and eggs. I hope that you enjoy the recipe!

Image

Banana Mocha Coconut Muffins

3/4 c. sweetened shredded coconut

2 c. all-purpose flour

1 c. granulated white sugar

2 T. instant coffee or 2 t. espresso powder

1 T. baking powder

1 c. mashed ripe bananas

1 c. coconut milk

1/2 c. canola oil

1 T. coconut rum

1 c. semi-sweet chocolate chips, preferably miniature ( use vegan chocolate if needed)

1 recipe Coffee Coconut Milk Glaze (below)

1. Preheat oven to 400 degrees F. Spread coconut on a baking sheet. Toast in oven for 3 to 4 minutes or until just starting to turn golden at the edges. Remove coconut from baking sheet and set aside.

2. Meanwhile, prepare 12 standard muffin cups or 10 four-ounce ramekins with baking spray.

3. In a large bowl, whisk together flour, sugar, 2 T. of the instant coffee or 2 t. of the espresso powder, and baking powder. Set aside.

4. In a medium bowl, whisk together bananas, coconut milk, canola oil, and rum. Stir banana mixture into dry ingredients. Fold in chocolate chips.

5. Divide batter into ramekins or muffin cups. Using the back of a spoon, shape each cup of batter into a slight mound. Bake 15 to 20 minutes for 12 muffins or 20 to 25 minutes for 10 muffins. Muffins are firm to the touch when done.

6. Meanwhile, prepare Coffee Coconut Milk Glaze. Glaze muffins immediately upon removing from oven and  then sprinkle them with toasted coconut.

Coffee Coconut Milk Glaze

1 c. confectioner’s sugar

2 T. coconut milk

1/2 t. minced orange or lemon zest

1/2 t. instant coffee or 1/4 t. instant espresso powder

1/2 t. coconut rum, light rum, or orange or lemon extract

1. In a small bowl, slowly stir coconut milk into confectioner’s sugar. Stir in coffee, then zest, then rum or extract. Stir until smooth, then warm glaze to dissolve coffee.

Searching for the Perfect Gluten-free White Butter Cake + Notes on Preparing Cake Pans

Part I.

As an innkeeper, I am aware of just how many people have food sensitivities or allergies and also of how difficult it can be for them to find foods that they can eat when they travel. This is especially the case when it comes to special events, such as  wedding receptions, where the food choices are limited.

I am working on perfecting my gluten-free white butter cake recipe which could be used for wedding cakes or baby showers. My goal, of course, is for my gluten-free cakes to be 100% as delicious as my regular wheat flour cakes. I would say that I am about 90% there with this particular cake. The flavor and crumb (cake texture) are good, but it does not quite have that melt-in-your mouth quality of my other cakes. I think that I just need to increase the butter a little on my next attempt. The two key issues to solve with gluten-free baking are (1) using the right wheat flour substitute for your recipe and (2) figuring out the right flour-fat ratio. In many recipes such as cookie recipes, a one-to-one substitution of rice flour for all-purpose flour works fine. Substitutions for specialty flours, such as cake flour, are a different story.

Normally I use cake flour for baking white butter cakes. Cake flour has a low protein content – 7.5% as compared to 10% for all-purpose flour- and weighs 3.5 oz. per sifted cup. While rice flour has an even lower protein content – 5% – it is not milled nearly as finely as cake flour. To lighten the texture of cakes made with rice flour, the flour needs to be blended with starches which are very fine in consistency. These starches also act as thickeners helping to compensate for the reduced protein content. The gluten-free cake flour blend that I made for this recipe is significantly lower in protein than cake flour – 2.5%, and is heavier weighing 4.5 oz. per double-sifted cup; but it works pretty well.

Laurie’s Gluten-free Cake Flour Blend:

Whisk together, and then sift together twice, the following ingredients.

1 c. white rice flour

1/2 c. tapioca starch

1/2 c. potato starch

1 T. Cake Enhancer (from King Arthur flour)

I used 9 oz. (by weight) of gluten-free cake flour blend as a substitute for 7 oz. cake flour in my regular white butter cake recipe. As I mentioned above, the flavor and crumb were good, but the cake didn’t have the melt in your mouth quality that really makes for a wonderful butter cake. Next time, I think that I shall increase the butter slightly. The other option would be to decrease the flour, but since the dry-wet ratio of the batter seemed right, I am going to try the increased butter option first – my theory being that the recipe needs increased fat to compensate for the increased weight of the flour.

If you have been experimenting with your own gluten-free cake recipes, I’d love to hear from you!

Image

Part II.

Proper preparation makes removing any cake from the pan easier.

(1) Place your baking pans on parchment paper and trace the outside with a pencil. Cutting just inside the pencil lines, cut paper to fit inside pans.

(2) Cut strips of parchment paper long enough to wrap around the sides of your pans, making the strips just taller than your cake pans.

(3) Butter the inside of the cake pans and one side of each of the pieces of parchment paper. Place paper, buttered side up/out in pans.

(4) Sprinkle with sifted flour or gluten-free flour. Tap pans to distribute the flour. Shake out any extra flour. (If you prefer to use baking spray, skip buttering the paper. But don’t use baking spray for gluten-free baking.) Fill with batter and bake.

(5)  After baking, allow cakes to cool then remove parchment paper from sides of pans, invert cakes, remove paper from bottoms of cakes, then re-invert.

Your cakes should turn out the pans perfectly each time.

CakePanPrep

CakeBatterInPans

BakedCakeInPan